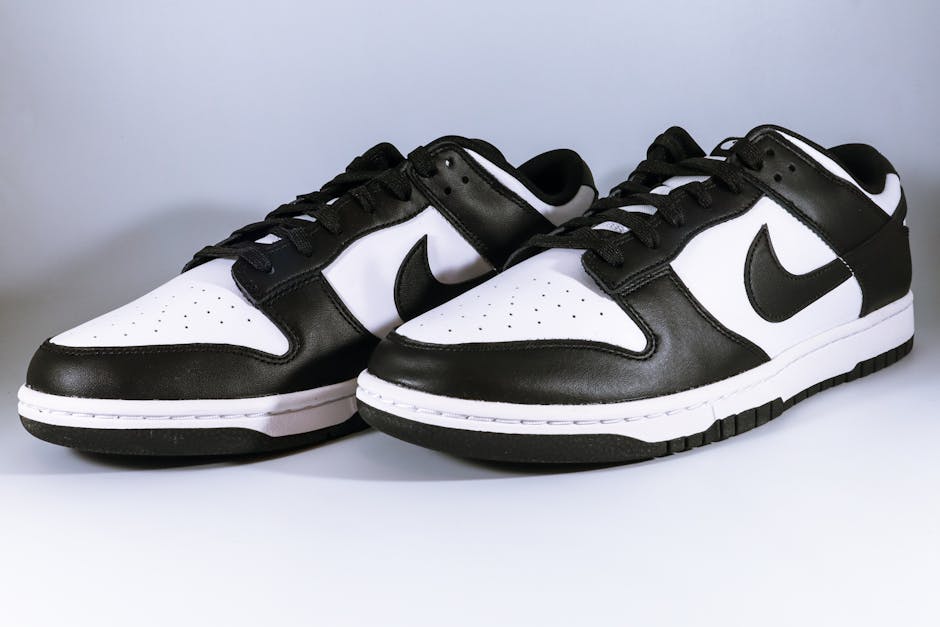
Giving Your Dunks New Life
Nike Dunk sole replacement is the process of removing worn, cracked, or deteriorated soles from Nike Dunk sneakers and replacing them with new ones to extend their lifespan. Here’s what you need to know:
| Nike Dunk Sole Replacement | Quick Facts |
|---|---|
| Average Cost | $35-$70 DIY, $95-$150 Professional |
| Time Required | 2-3 hours DIY, 2-4 weeks Professional (including shipping) |
| Best For | Yellowed soles, separation, cracks, worn tread |
| Options | DIY kits, Mail-in services, Local cobbler |
| Materials Needed | Replacement soles, Contact cement, Utility knife, Clamps |
When your favorite Nike Dunks start showing signs of wear – whether it’s yellowing soles, separation between the upper and midsole, or cracks in the rubber – you don’t have to retire them. Nike Dunk sole replacement can breathe new life into your beloved sneakers, saving you money while reducing environmental waste.
Replacing your Nike Dunk soles isn’t just about aesthetics. Worn soles compromise traction, comfort, and can even affect your posture and walking mechanics. For vintage pairs, deterioration is inevitable as the polyurethane in older midsoles breaks down over time, leading to the dreaded “crumbling” effect that renders sneakers unwearable.
I’m Eric Neuner, founder of NuShoe Inc, and since 1994, I’ve overseen the rebuilding of over 4 million pairs of shoes, including countless Nike Dunk sole replacements, using materials that match or exceed the quality of the originals.

Understanding Wear & Replacement Basics
When your beloved Nike Dunks start showing signs of aging, it’s good to know what’s happening and what can be done about it. Nike Dunk sole replacement isn’t just a service—it’s a way to breathe new life into sneakers that still have plenty of stories to tell.
Over time, even the most cherished Dunks will show wear. The most heartbreaking issue for collectors is midsole dry-rot. This happens through a process called hydrolysis, where the polyurethane materials naturally break down over time. As one passionate sneakerhead on the NikeTalk forums put it, “There’s no way to fix crumbling midsoles once they’ve reached that point. They’re only good for display.”
You’ll also notice other common wear patterns that signal it’s time for some attention:
Your Dunks might develop heel drag where the back edge wears down from your natural walking pattern. You might experience the dreaded outsole separation, where the rubber bottom starts peeling away from the midsole. Traction problems emerge as the once-grippy tread patterns smooth out. And perhaps most noticeably, that bouncy, cushioned feel gradually disappears as the midsole foam compresses or hardens.
There’s an important distinction between vintage and retro Dunks worth noting. Original releases from the ’80s and early ’90s used materials that are much more prone to deterioration, while more recent retro releases typically feature modern, more durable compounds. This affects both how quickly they wear out and what replacement options will work best.
What is a Nike Dunk Sole Replacement?
Nike Dunk sole replacement comes in several forms, depending on what your sneakers need:
Sometimes, all you need is a simple outsole reattachment when the rubber bottom separates but is otherwise in good shape. Other times, you might need just the outsole replaced—that’s the rubber bottom layer that contacts the ground. In more serious cases, particularly with vintage pairs, you might need a full sole swap, replacing both the midsole and outsole together.
For a complete sole swap, you’ll need “donor” parts. These can come from OEM (Original Equipment Manufacturer) parts—soles from the same model of Nike Dunks—or from aftermarket replacements, which are third-party manufactured soles designed specifically to fit Nike Dunks.
William from Sydney shared his experience with us: “I had a pair of 2002 Dunk Highs with crumbling midsoles but perfect uppers. NuShoe was able to source compatible donor soles from a newer release, saving my favorite pair that I thought were goners.”
When Do Dunks Need New Soles?
Your sneakers have a way of telling you when they need help. Here are the signs that your Nike Dunks are crying out for sole replacement:
Visible cracks appearing in the midsole or outsole are a clear warning sign. Yellowing or oxidation that doesn’t respond to even the most thorough cleaning suggests deeper material breakdown. Squeaking sounds when walking often indicate separation between layers. Uneven tread wear can affect your gait and comfort. Visible air bubbles or holes in the midsole mean the structure is compromised. And perhaps most obviously, a significant loss of comfort compared to when they were new tells you the cushioning properties are failing.
“The most telltale sign is when you see what looks like dust or crumbs falling from your shoes,” explains our head cobbler at NuShoe. “That’s actually the midsole disintegrating, and once it starts, it progresses quickly.”
Understanding these basics helps you recognize when it’s time to consider Nike Dunk sole replacement options—whether that means a simple repair or a complete overhaul to save your favorite kicks from the landfill.
DIY vs Professional Nike Dunk Sole Replacement
Stuck between fixing your kicks yourself or sending them to the pros? When it comes to Nike Dunk sole replacement, this decision comes down to your comfort level, how much you value your sneakers, what tools you have on hand, and how much time you’re willing to invest.

Let’s break down the key differences:
| Factor | DIY Approach | Professional Service |
|---|---|---|
| Cost | $35-$70 + tools | $95-$150 all-inclusive |
| Time Investment | 2-3 hours active work + 24h curing | 5 minutes to package and ship |
| Tools Required | Utility knife, acetone, heat gun, clamps, etc. | None (they have everything) |
| Risk Level | High (especially for beginners) | Low (insured services available) |
| Warranty | None | Often 30-90 days |
| Turnaround Time | Same day (plus 24h curing) | 2-4 weeks including shipping |
| Results | Variable based on skill | Consistent professional finish |
Pros & Cons of DIY Nike Dunk Sole Replacement
There’s something satisfying about fixing your own sneakers. DIY Nike Dunk sole replacement gives you immediate results and can save you some cash if you already have the right tools. Plus, you’ll pick up some valuable skills along the way and have complete control over materials and process.
But let’s be real – there are downsides too. You’ll need specialized tools like a heat gun and clamps that might cost more than you expect. There’s also a genuine risk of damaging your uppers, especially if they’re valuable pairs. The learning curve can be pretty steep, and your first attempt probably won’t look professional. Oh, and there’s no warranty if things go sideways.
Maria, one of our regular customers, learned this the hard way: “I tried DIY on my college dorm room floor with a hair dryer and some super glue. Let’s just say my cherished Dunks ended up looking like a craft project gone wrong. I should have sent them to professionals from the start.”
One clever DIY enthusiast shared this gem with us: “Use small wooden dowels to keep surfaces apart while aligning the adhesive. Then remove them one by one for perfect bonding without misalignment.” Smart tip, but it still requires practice to master.
Why Choose a Cobbler or Sneaker Lab?
When you opt for professional Nike Dunk sole replacement, you’re not just paying for convenience – you’re investing in expertise.
Professionals like our team at NuShoe bring thousands of sole replacements worth of experience to each pair. We have access to premium materials through direct relationships with suppliers like Vibram. Our workshop houses industrial-grade heat stations, presses, and specialized stitching machinery that simply aren’t available to most DIYers.
Need donor soles? Professional services can often locate compatible ones for you, saving you the headache of hunting them down yourself. And the time savings is significant – you simply ship your sneakers and get them back restored, without turning your kitchen into a temporary workshop.
James from Portland told us: “This was my first experience ever having footwear resoled… If that seems like a long time, trust me: it’s worth the wait!” We couldn’t agree more.
The peace of mind is perhaps the biggest advantage. At NuShoe, we don’t charge until your shoes actually enter repair, and we stand behind our work with a satisfaction guarantee. When you’re dealing with your treasured Dunks, that assurance can be priceless.
As our head cobbler likes to say, “If you’re working with valuable or rare Dunks, I’d strongly caution against DIY for your first attempt. Practice on a less precious pair first – or better yet, let the professionals handle your prized possessions.”
Looking to glue your sneaker sole back yourself? We’ve got guides for that. But remember, there’s no shame in calling in the experts when your favorite kicks deserve the very best care.
Step-by-Step DIY Nike Dunk Sole Replacement
Ready to give your beloved Dunks a new lease on life? If you’ve decided to tackle Nike Dunk sole replacement yourself, you’re in for a rewarding project. Just remember – this isn’t a rush job. The process requires patience, steady hands, and the right preparation.

Tools & Materials Checklist
Before diving in, let’s make sure you’re properly equipped. Think of this as your sneaker surgery kit:
Your safety comes first – grab gloves, eye protection, and a mask (those adhesive fumes are no joke). You’ll need replacement soles (either donor parts or aftermarket options), a sharp utility knife with fresh blades, and a Dremel tool for precision work. Don’t forget acetone for cleaning off old adhesive, quality contact cement (we recommend Barge or Shoe Goo), small brushes for adhesive application, clamps or weights for the curing stage, some 120-grit sandpaper, and a clean, well-ventilated workspace.
“I learned the hard way that proper ventilation isn’t optional,” shares Marcus, a DIY enthusiast from Portland. “My wife wasn’t thrilled when our entire apartment smelled like contact cement for three days!”
8-Step Replacement Process
Let’s break down this sneaker resurrection into manageable steps:
Step 1: Remove the old sole
Take your time here – rushing leads to damaged uppers. Work your utility knife slowly around the perimeter, separating the old sole. For stubborn spots, a heat gun on low setting can help soften the adhesive, but use it sparingly to avoid warping the upper.
Step 2: Clean all surfaces
This step might seem tedious, but it’s absolutely crucial. Use acetone and a cloth to remove every bit of old adhesive residue. Any leftover gunk will prevent your new sole from bonding properly. Clean surfaces = strong bond.
Step 3: Sand contact surfaces
Grab your 120-grit sandpaper and lightly rough up both the bottom of the midsole and the top of your replacement sole. This creates tiny grooves that give the adhesive something to grip onto – think of it as creating microscopic Velcro.
Step 4: Perform a dry fit
Before any glue comes out, test-fit your new sole to ensure proper alignment. This is your dress rehearsal. Mark alignment points with a pencil if it helps – many DIYers use small dots at the toe, heel, and sides.
Step 5: Apply first adhesive coat
Apply a thin, even layer of contact cement to both the midsole and replacement sole. Patience is key – allow it to dry until tacky (usually 15-20 minutes, but always check manufacturer instructions). Too wet, and you’ll have a mess; too dry, and it won’t bond properly.
Step 6: Apply second adhesive coat
Yes, you really do need a second coat! Apply another thin layer to both surfaces and let it become tacky again. This double-coat method significantly improves bond strength.
Step 7: Align and join the surfaces
Here’s where the magic happens – and where mistakes can’t be undone. Contact cement bonds on first touch, so alignment must be perfect. Try this pro tip: place small dowels between surfaces, align carefully, then remove dowels one by one while pressing surfaces together.
Step 8: Apply pressure and cure
Use clamps, weights, or strong rubber bands to apply even pressure across the entire sole. Now comes the hardest part – waiting. Allow at least 24 hours for proper curing before wearing. Many professionals recommend 48-72 hours for optimal strength.
Common Mistakes to Avoid
Even experienced DIYers make mistakes. Here are the pitfalls to watch for:
Rushing the curing time is probably the most common error. Those shoes might look ready after a few hours, but the bond needs at least 24 hours to reach full strength. Be patient!
Poor alignment can ruin an otherwise perfect job. Once contact cement touches, repositioning is nearly impossible, so take your time with step 7.
Overheating with your heat gun can warp or damage the upper material. Use heat sparingly and keep the gun moving.
Wrong donor size will create a world of problems. Replacement soles must match exactly, or you’ll end up with overhang or underhang.
Using cheap adhesive might save a few dollars upfront but will cost you when your sole starts separating two weeks later. Quality contact cement is non-negotiable.
Skipping surface preparation is like painting over dirt – the new finish won’t last. Don’t skip the cleaning and sanding steps!
“I tried to save time by skipping the second coat of adhesive,” admits Jamie from Chicago. “Three weeks later, the sole started separating at the toe. Don’t take shortcuts like I did!”
If your Dunks are particularly valuable or you’re feeling unsure about the DIY route, there’s no shame in seeking professional help. At NuShoe, we’ve seen plenty of DIY attempts come to us for rescue missions. But with careful preparation and patience, a Nike Dunk sole replacement can be a satisfying weekend project that gives your favorite kicks many more miles of wear.
Choosing Replacement Soles, Services & Aftercare
Selecting the right replacement soles is crucial for a successful Nike Dunk sole replacement. Your options include:
- OEM donor parts: Soles from the same or compatible Nike Dunk models
- Aftermarket options: Companies like ScissorsUp offer SB Dunk replacement soles in various colors
- Vibram soles: Premium rubber outsoles known for durability and traction
- Sole protectors: Thin protective films that extend the life of existing soles
Best Aftermarket Options for Dunks
When it comes to giving your Dunks new life, not all replacement soles are created equal. For most sneakerheads, ScissorsUp SB Dunk Soles are the go-to aftermarket option, offering multiple colorways including White/Black, Clear, White/Gum, and even eye-catching Glow-in-the-Dark options – all priced reasonably at around $40 per pair.
For those looking for extra durability, the Vibram #4014 Cristy sole delivers exceptional traction and longevity. These premium soles are perfect for custom builds or if you’re planning to put serious miles on your Dunks.
Purists often prefer OEM Retro Parts – donor soles sourced from newer retro releases. While sometimes harder to find, they provide the most authentic look and feel, especially important for vintage Dunks.
Sonja from Central Coast shared her experience with us: “I was skeptical about aftermarket soles, but the ScissorsUp replacements actually have better grip than my originals did. Plus, I was able to switch from a plain white sole to the gum bottom I always wanted.”
How to Pick a Reputable Service
Finding the right professional for your Nike Dunk sole replacement can make all the difference between disappointment and delight. Start by checking if they have specific experience with Nike sneakers – not all cobblers understand the unique construction of Dunks.
Customer reviews tell the real story, so look for detailed feedback about similar projects. The best services will request photos before quoting, showing they understand each job’s unique challenges. They should also offer shipping insurance options to protect your precious kicks during transit.
Don’t be shy about asking what equipment they use and what replacement materials they’ll be working with. Transparency here is a good sign of professionalism.
“When I called NuShoe about my 2001 Dunks, they asked specific questions about the model and year that showed they understood the differences between versions,” recalls Veronica from Sydney. “That gave me confidence they knew what they were doing.”
Caring for Your New Soles
After investing in a Nike Dunk sole replacement, proper care will maximize your return on investment. First, be patient with the break-in period. Allow 1-2 weeks of light wear for adhesives to fully cure and for the soles to conform to your walking pattern.
Regular cleaning makes a huge difference – simply wiping your soles with a damp cloth after each wear prevents dirt buildup that can accelerate wear. Avoid extreme temperatures whenever possible, as heat can weaken adhesive bonds over time.
Many sneaker enthusiasts swear by sole protectors like Sole Protector Plus+™ ($29.99). These thin, clear films add an extra layer of protection and can be replaced after about 30 wears, keeping your actual soles pristine underneath.
Rotating your sneakers rather than wearing the same pair daily gives adhesives time to recover and prevents premature deterioration. And when they’re not on your feet, store your Dunks in a cool, dry place away from direct sunlight to prevent materials from degrading.
One satisfied customer told us, “I invested in sole protectors for my newly resoled Dunks, and a year later, the soles still look brand new underneath. Best $30 I’ve spent on sneaker care.”
Frequently Asked Questions about Nike Dunk Sole Replacement
How much does a Nike Dunk sole replacement cost?
The price tag for a Nike Dunk sole replacement can vary quite a bit depending on which path you choose:
If you’re going the DIY route with aftermarket soles, expect to spend about $40-$60 for the soles themselves, plus another $15-$30 for quality adhesives and tools. Going with donor soles? That’ll run you $60-$100 for the donor sneakers, plus your materials.
For those who’d rather leave it to the pros, professional services typically range from $95-$150 for a complete resoling job. Here at NuShoe, our Traveler NuCraft service costs $95 and includes premium Vibram rubber soles, complete refinishing, and even new laces to freshen up your kicks.
One of our happy customers put it perfectly: “The $95 I spent resoling my vintage Dunks saved me from spending $350+ on a new pair. Plus, I got to keep the uppers that had broken in perfectly to my feet.” It’s hard to argue with that math!
That if you’re after premium or rare donor soles, your costs might climb significantly higher. But for many sneakerheads, the investment is worth it to revive a beloved pair.
How long does Nike Dunk sole replacement take?
Time is always a factor when considering a Nike Dunk sole replacement. Here’s what you can expect:
For the weekend warriors tackling this as a DIY project, set aside 2-3 hours of hands-on work. But remember – patience is key! You’ll need at least 24 hours of curing time before your sneakers are ready to hit the streets again.
If you’re sending your beloved Dunks to the professionals, the timeline stretches a bit longer. The entire process typically takes 2-4 weeks total, which breaks down like this:
Shipping to the repair facility eats up about 2-5 business days. Once your sneakers arrive, basic repairs generally take another 2-5 business days, while more complex work might need 1-2 weeks of shop time. Then there’s the return shipping, which adds another 2-5 business days to get your refreshed kicks back on your doorstep.
Most repair services follow similar timelines. As one service states, “Basic sneaker repairs are generally completed within 2-5 business days after arrival, with more complex repairs taking 1-2 weeks.”
Will a sole swap hurt resale value?
This is the million-dollar question for many collectors, and the honest answer is: it depends.
For deadstock collectors hunting pristine, untouched pairs, any modification – including a Nike Dunk sole replacement – typically reduces value. These folks are after factory-original condition, no exceptions.
However, the equation changes dramatically for vintage pairs with crumbling soles. In these cases, a professional replacement can actually increase value by changing an unwearable display piece into functional footwear again. As one collector shared with us: “I had a pair of ’99 Dunks with completely crumbled soles sitting in my closet for years. After a professional sole swap, they’re wearable again and worth more than they were as a crumbling display piece.”
If you’re concerned about maintaining value while still getting your repair, follow these best practices:
Take detailed photos documenting the original condition before any work begins. Keep all receipts from professional services as proof of quality work. Always disclose all repairs when selling, and whenever possible, preserve the original parts in case a future buyer wants them.
Completely unwearable shoes have limited value regardless of originality. Sometimes, a quality restoration is the best way to preserve both the sneaker and its value.

The environmental impact is worth considering too – by extending the life of your Dunks through sole replacement, you’re making a sustainable choice that keeps perfectly good uppers out of landfills.
Conclusion
Nike Dunk sole replacement isn’t just a repair—it’s a statement about sustainability and sneaker love. By choosing to restore rather than replace, you’re extending the life of your favorite kicks while keeping perfectly good uppers out of landfills. There’s something deeply satisfying about watching a worn-out pair transform into something fresh and wearable again.
Whether you’ve rolled up your sleeves for the DIY approach or shipped your beloved Dunks to professionals, you’re participating in a tradition that values craftsmanship and longevity over disposable fashion. The sneaker culture has always had a preservation element to it, and sole replacement sits at the heart of that ethos.
At NuShoe, we’ve been fortunate enough to be part of this movement since 1994, with our craftspeople having given new life to over 5 million pairs of shoes—many of them Nike Dunks. Our team takes genuine pride in matching or even improving upon original materials, ensuring your sneakers can continue their journey with you for thousands more steps.
Your newly-resoled Dunks will need some thoughtful care to maximize their second life. Regular cleaning after wear, rotating between different pairs to allow recovery time, and storing them away from heat and direct sunlight will all help extend their lifespan. For those special colorways or limited editions, consider adding sole protectors for an extra layer of defense against daily wear.
Your motivation might be preserving a vintage treasure that holds special memories, maintaining a daily wearer that fits just right, or even customizing your favorite pair with a fresh sole color—whatever the reason, Nike Dunk sole replacement offers a path to continued enjoyment of these iconic sneakers.
Ready to give your Dunks a new lease on life? More info about Nike shoe repair services is available if you’d rather trust the experts with your precious pairs.
When “new” is often valued over “renewed,” choosing repair over replacement isn’t just kinder to your wallet—it’s kinder to the planet. And that’s a step in the right direction.