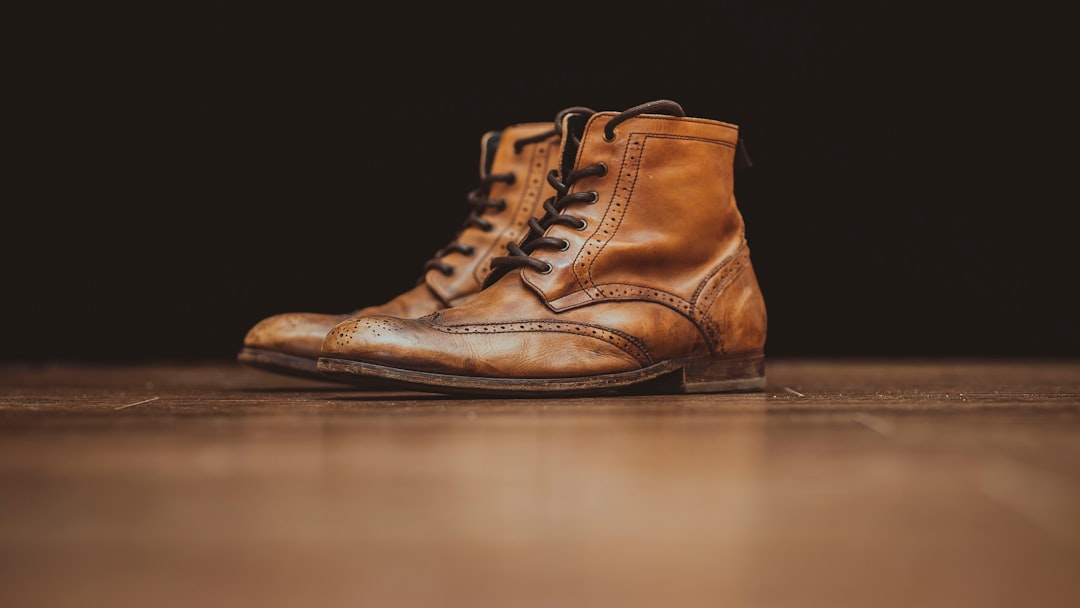
Refinishing leather boots can breathe new life into your cherished footwear, saving you money and helping the environment all at once. This process improves the longevity of your boots, allowing you to appreciate their craftsmanship for a longer time. Here’s a quick rundown of why you should consider refinishing leather boots:
- Sustainability: Refinishing extends boot life and prevents waste.
- Cost-effectiveness: It’s cheaper than buying new boots.
- Craftsmanship: Experience the satisfaction of preserving quality leather footwear.
At NuShoe, we understand the passion for quality leather boots. As the founder of NuShoe Inc., I’ve devoted years to perfecting the craft of refinishing leather boots, ensuring they are restored as close to their original condition as possible. Join me in this journey, and let’s dig into how you can make your leather boots last for years to come.

Learn more about refinishing leather boots:
– Leather shoe color restoration
– Leather shoe crack repair
– Professional shoe cleaning service
Why Refinish Leather Boots?
Refinishing leather boots is more than just a practical choice—it’s a smart and rewarding endeavor. Here’s why:
Save Money
Refinishing your leather boots is a savvy financial move. High-quality leather boots can be pricey, and replacing them every time they show wear and tear isn’t budget-friendly. By investing a little time and effort into refinishing, you can extend the life of your boots significantly. According to NuShoe, proper care and timely repairs can prolong the life of your boots by decades.
Prevent Waste
Every pair of boots you refinish is one less pair destined for a landfill. Leather is notoriously slow to decompose, which means discarded boots contribute to environmental waste. By choosing to refinish over replace, you make a small but meaningful impact on reducing landfill waste. A Reddit user once shared how they repaired their grandfather’s boots, keeping both their utility and sentimental value intact.
Meditative Practice
The process of refinishing leather boots can be surprisingly meditative. Cleaning, conditioning, and polishing require focus and patience, changing a routine task into a form of mindfulness. It’s a rewarding experience that allows you to connect with your footwear on a deeper level.
Tip: Set aside a quiet afternoon to work on your boots. The process can be calming and satisfying.
Appreciate Craftsmanship
High-quality leather boots often showcase exceptional craftsmanship. By refinishing them, you get a chance to appreciate the intricate details and hard work that went into making them. It’s a way to honor the artisans who created your boots. As quoted by NuShoe, “Each scuff and stitch tells a story. By caring for your boots, you’re not just maintaining a pair of shoes but preserving a piece of craftsmanship.”
Refinishing your leather boots is a holistic practice that benefits both you and the environment. Let’s move on to the essential supplies you’ll need to begin your leather boot refinishing journey.
Essential Supplies for Refinishing Leather Boots
Refinishing leather boots requires the right tools and products to ensure a successful change. Here’s a breakdown of the essentials you’ll need:
Saddle Soap
Saddle soap is a must-have for cleaning leather boots. It effectively removes dirt and grime while moisturizing the leather. Apply it with a sponge or cloth in circular motions to create a lather. This prepares the leather for further treatment and ensures a clean base for refinishing.
Leather Conditioner
After cleaning, it’s crucial to condition the leather to keep it soft and flexible. A good leather conditioner, like Lexol, nourishes the leather and prevents cracking. Apply it evenly with a clean cloth and let it soak in for a few hours or overnight. This step is vital for maintaining the longevity of your boots.
Leather Boot Cream
Leather boot cream is perfect for restoring color and adding a protective layer. It contains pigments that penetrate the leather, reviving its appearance. Use an applicator brush to apply the cream evenly across the boot surface. This step helps in repairing minor scuffs and scratches.
Leather Boot Polish
For a high-mirror shine, leather boot polish is your go-to product. Opt for a wax polish for better shine, but use it sparingly as it can dry out the leather over time. Apply the polish with a soft cloth or a horsehair brush dauber for the best results.
Horsehair Brush
A horsehair brush is essential for both cleaning and polishing your boots. Its soft bristles are gentle on leather, making it ideal for brushing off dirt and buffing the polish to a shine. It’s a versatile tool that should be part of any boot care kit.
Polish Applicator
A polish applicator, such as an old sock or a soft cloth, helps apply boot cream and polish evenly. Wrap the cloth around your fingers for better control and precision. This ensures that the product is applied smoothly and evenly across the boot surface.
Clean Cloth
A clean cloth is versatile and can be used for applying products, wiping off excess, and buffing the leather. Ensure it’s soft to avoid scratching the leather. Having a few on hand is always a good idea during the refinishing process.
Old Toothbrush
An old toothbrush is perfect for cleaning hard-to-reach areas, like the welting where the upper meets the outsole. It’s excellent for scrubbing away dirt and grime from nooks and crannies, ensuring a thorough clean.
Heat Gun or Clothing Iron
For fixing creases, a heat gun or clothing iron can be useful. Use it with a damp towel to gently heat and smooth out the leather. Be cautious not to overheat, as this can damage the leather. This step helps in restoring the boot’s original shape and appearance.
With these supplies in hand, you’re ready to start on your leather boot refinishing journey. Let’s explore the step-by-step guide to bring your boots back to life.
Step-by-Step Guide to Refinishing Leather Boots
Refinishing leather boots is a satisfying process that can breathe new life into your favorite footwear. Follow these steps to ensure your boots look as good as new.
Prep the Area
Start by setting up a clean workspace. Lay down newspaper or an old cloth to catch any dirt or polish that might spill. Remove the laces from your boots. If you have boot trees, insert them to maintain the shape while you work.
Brush Off the Dirt
Use a horsehair brush to gently remove dirt and dust from the surface of your boots. Be thorough but gentle to avoid scratching the leather. For those hard-to-reach spots, like the welting, an old toothbrush works wonders.
Clean with Saddle Soap
Next, apply saddle soap to clean and moisturize the leather. Use a sponge or cloth to work the soap into a lather using circular motions. This will remove grime and prepare the leather for the next steps. Wipe away excess soap with a clean cloth and let the boots dry for at least 15 minutes.
Fix Creases
To tackle creases, use a heat gun or clothing iron. If using a heat gun, gently pass it over the creased areas. For a clothing iron, place a damp towel over the leather and set the iron to the cotton setting. Press gently over the towel. Insert cedar shoe trees or balled-up newspaper to help the boots retain their shape as they cool.
Condition the Boots
After cleaning, it’s time to condition the leather. Apply a leather conditioner like Lexol with a clean cloth. This step is crucial to keep the leather soft and prevent cracking. Let the conditioner soak in for a few hours or overnight.
Recolor with Cream Polish
Once conditioned, use a cream polish that matches your boots to restore color. Apply a small amount to an inconspicuous area first to test the color. Then, use an applicator brush to spread the cream polish in small circles. Let it dry for at least 5 minutes before buffing with a horsehair brush for a smooth finish.
Wax Shine (Optional)
For a high-mirror shine, apply wax polish. This step is optional but can give your boots a polished look. Use a soft cloth or a horsehair brush dauber to apply the wax polish. Buff the leather to a shine once the polish has dried.
Lace Up
Finally, it’s time to lace up your boots. Use the cleaned and dried laces for a cohesive look. Now, step back and admire your beautifully refinished boots.

With these steps, your leather boots will be ready for any trip! Up next, we’ll explore common leather boot issues and how to fix them.
Common Leather Boot Issues and How to Fix Them
Even the best leather boots can face a few common issues over time. Here’s how to tackle them:
Sole Separation
Sole separation occurs when the sole starts peeling away from the boot, making them unsafe and uncomfortable.
Steps to Fix Sole Separation:
-
Clean the Area: Use isopropyl alcohol to clean both the sole and the bottom of the boot. This removes any oils or residues that might prevent the adhesive from sticking.
-
Apply Adhesive: Use Aquaseal SR for a strong bond. Apply it evenly to both the sole and the boot.
-
Clamp the Sole: Use a clamp or duct tape to hold the sole and boot together. Ensure they are tightly pressed.
-
Cure Time: Let the adhesive cure for at least 8-12 hours. This ensures a durable fix.
Pro Tip: Place the boot on a level surface while it cures to avoid misalignment.
Heel Wear
Heel wear is common because your heel takes a lot of stress. Over time, the heel can wear down or even detach.
Steps to Fix Heel Wear:
-
Clean the Heel: Clean the heel area with isopropyl alcohol.
-
Apply Adhesive: Apply Aquaseal SR to the heel.
-
Weight Application: Use a heavy book or a weight to apply even pressure and ensure a tight bond.
-
Cure Time: Let the adhesive cure for 8-12 hours.
-
Sanding: Once cured, sand the heel lightly to remove rough edges.
-
Duct Tape Mold: Wrap duct tape around the heel to keep its shape while the adhesive cures.
Pro Tip: Firmly taping the heel ensures a professional finish.
Toe Separation
Toe separation often occurs from frequent kneeling or putting pressure on your toes.
Steps to Fix Toe Separation:
-
Clean the Area: Clean the toe area with isopropyl alcohol.
-
Apply Adhesive: Apply Aquaseal SR to both the sole and the toe.
-
Secure with Tape: Use duct tape to hold the toe and sole together while the adhesive cures.
-
Cure Time: Allow 8-12 hours for the adhesive to fully cure.
Pro Tip: Ensure the toe and sole are aligned properly before securing with tape.
Rips and Tears
Rips, tears, and cracks can make your boots look worn out and can worsen if not addressed.
Steps to Fix Rips, Tears, and Cracks:
-
Clean the Area: Use isopropyl alcohol to clean the damaged area.
-
Apply Leather Adhesive: For minor tears, use a leather adhesive to bond the edges. For larger rips, consider using a leather filler.
-
Condition the Leather: Once the adhesive or filler has cured, apply a leather conditioner to nourish and soften the leather.
-
Recolor with Leather Dye: Use a leather dye to blend the repaired area with the rest of the boot.
Pro Tip: Always spot test any product on an unnoticeable part of the boot first.
By addressing these common issues, you can extend the life of your favorite leather boots. Next, we’ll explore advanced techniques for leather boot refinishing.
Advanced Techniques for Leather Boot Refinishing
When your leather boots face more complex issues, basic fixes might not be enough. It’s time to dive into advanced techniques like rand repair and boot panel fixes.
Rand Repair
The rand is the thin rubber layer on your hiking boots. It’s there to protect against sharp objects and abrasions. If it starts peeling, it can weaken your boots’ durability.
Steps to Repair the Rand:
-
Clean the Rand: Use isopropyl alcohol to remove dirt and residues. This helps the adhesive stick better.
-
Apply Adhesive: Use Aquaseal SR to fill any gaps in the rand. It’s known for creating a strong bond.
-
Secure with Tape: Firmly tape the area to keep pressure on the bond. This ensures it sets properly.
-
Cure Time: Let it cure for 8-12 hours. This time is crucial for a long-lasting fix.
Pro Tip: Taping the rand tightly can make the repair more durable.
Boot Panel Fix
A torn boot panel can lead to discomfort and less protection for your feet. Here’s how to fix it:
Steps to Fix a Torn Boot Panel:
-
Clean the Area: Use isopropyl alcohol to clean both sides of the tear. This removes any oils or dirt.
-
Apply Aquaseal SR: Carefully apply adhesive to both sides of the tear. This helps hold the pieces together.
-
Press Together: Hold the pieces together and tape them to maintain alignment.
-
Cure Overnight: Allow the adhesive to cure overnight for a strong bond.
Pro Tip: Make sure the pieces are aligned properly before taping to avoid uneven seams.
By mastering these advanced techniques, you can tackle tougher repairs and extend the life of your leather boots. Next, we’ll answer some frequently asked questions about leather boot refinishing.
Frequently Asked Questions about Leather Boot Refinishing
Can Ripped Boots Be Repaired?
Absolutely, ripped boots can often be salvaged with the right approach. Leather adhesive and leather filler are key players in this repair process. Here’s how you can tackle those tears:
-
Clean the Area: Start by cleaning the ripped section with isopropyl alcohol. This removes dirt and oils, helping the adhesive stick better.
-
Apply Leather Adhesive: Use the adhesive on the torn edges and press them together. For larger rips, consider adding a leather patch for extra stability.
-
Secure with Tape: Use duct tape to hold the pieces in place while the adhesive cures. This ensures a strong bond.
If you’re not confident doing this yourself, consider visiting a cobbler. They have the expertise to handle even the most challenging repairs, making your boots look almost new.
Are Boots Worth Repairing?
Yes, repairing boots is often a smart choice for several reasons:
-
Cost-Effective: Repairing is usually cheaper than buying new boots. A Reddit user shared how they saved money by fixing their grandfather’s boots, which also held sentimental value.
-
Environmental Benefits: Repairing helps reduce waste. According to NuShoe, proper care and timely repairs can extend your boots’ life by decades. This keeps them out of landfills and contributes to sustainability.
-
Sentimental Value: If your boots have sentimental value, repairing them is a great way to preserve both their utility and emotional significance.

Can Holes in Boots Be Repaired?
Yes, holes can be repaired, but the method depends on the boot material:
-
Leather Boots: For leather, use leather filler or a leather patch. Clean the area with isopropyl alcohol, apply the filler, and let it cure. For patches, sew them on the inside and use adhesive for extra security.
-
Rubber Boots: Products like Shoe Goo are effective. Clean the area, apply the Shoe Goo, and smooth it out. Let it cure completely.
For both types, applying a weatherproof sealant is crucial to maintain the boot’s waterproof qualities. A Reddit user described how they used contact cement and a leather patch to fix a hole in their boot, achieving an almost invisible repair.
With these FAQs addressed, you’re now better equipped to handle common leather boot refinishing challenges. Next, we’ll explore the conclusion and how NuShoe can assist in your boot repair journey.
Conclusion
Refinishing leather boots is more than just a practical task; it’s a journey into sustainability and craftsmanship. At NuShoe, we believe in the power of handcrafted renewal. Since 1994, we’ve repaired over 5 million pairs of shoes, breathing new life into footwear that might otherwise end up in landfills.
Sustainability is at the heart of what we do. By choosing to repair and refinish your leather boots, you’re making a sustainable choice. You’re reducing waste and extending the life of your footwear, which is kinder to the planet. Each pair of boots we repair is one less pair that contributes to landfill waste.
Our commitment to handcrafted renewal means that we treat each pair of boots with the care and attention they deserve. Our expert craftsmen use their skills to restore your boots to their former glory, preserving the craftsmanship that went into making them in the first place. This not only saves you money but also allows you to appreciate the artistry behind every stitch and scuff.
Whether you’re an enthusiast looking to maintain your favorite boots or someone new to leather footwear, we’re here to help. Find more about our services and how we can assist you in your leather boot refinishing journey by visiting our leather shoe repair page.
Accept the satisfaction of giving your boots a second life while contributing to a more sustainable future. With NuShoe, your boots are in expert hands.